In This Article
Category:
How To
I've had a few days during the HMX build while I'm either waiting for parts or waiting for something to dry and had some free time. I'm not exactly one to sit and watch TV when I have nothing planned, so I set out on another project.
While I have electricity out to the garage now, heat has been an issue all winter long. Mattar graciously lent me his kerosene heater, which did an okay job of taking the bite off the chill. Insulating the garage would go a long way to help keep the bitter Vermont cold out, but that's a project for another day. I decided instead to take advantage of the south-facing side of the garage and build a solar furnace to collect some of that sunshine just bouncing straight off my garage. My dad built one years ago and said he recorded a 110-degree temperature differential between inlet and outlet. And I had enough scrap materials around the basement to do something similar to what my dad built.
 “Oil pan. Oil Pan! OIL PAN!” Sorry, I can’t help myself when I see that photo of the blue 1958 Ford approaching the rocks.
I started with some 2x4s and plywood to build a simple box. I'm no carpenter, but I learned that if it's wobbly, just add more nails.
“Oil pan. Oil Pan! OIL PAN!” Sorry, I can’t help myself when I see that photo of the blue 1958 Ford approaching the rocks.
I actually built the box to certain dimensions, based on what scrap materials I had and on the dimensions of my heat collection method - aluminum cans. That sure was a lot of Sprite. Fifty cans in five columns of 10 will funnel the air upward.
“Oil pan. Oil Pan! OIL PAN!” Sorry, I can’t help myself when I see that photo of the blue 1958 Ford approaching the rocks.
Sealed the box using adhesive caulk, just to keep any heated air from escaping the box.
“Oil pan. Oil Pan! OIL PAN!” Sorry, I can’t help myself when I see that photo of the blue 1958 Ford approaching the rocks.
So you may have already thought, "How can air climb the columns of cans when there's no hole at the bottom of the can?" Answer: drill press and 3/4-inch bit. Times 45.
“Oil pan. Oil Pan! OIL PAN!” Sorry, I can’t help myself when I see that photo of the blue 1958 Ford approaching the rocks.
The last five cans, the bases of each column, will sit on the bottom of the box and thus will be unable to draw air from underneath, so I poked holes in the sides of each of the five.
“Oil pan. Oil Pan! OIL PAN!” Sorry, I can’t help myself when I see that photo of the blue 1958 Ford approaching the rocks.
Stack the cans with liberal doses of adhesive caulk. Give them enough time to dry.
“Oil pan. Oil Pan! OIL PAN!” Sorry, I can’t help myself when I see that photo of the blue 1958 Ford approaching the rocks.
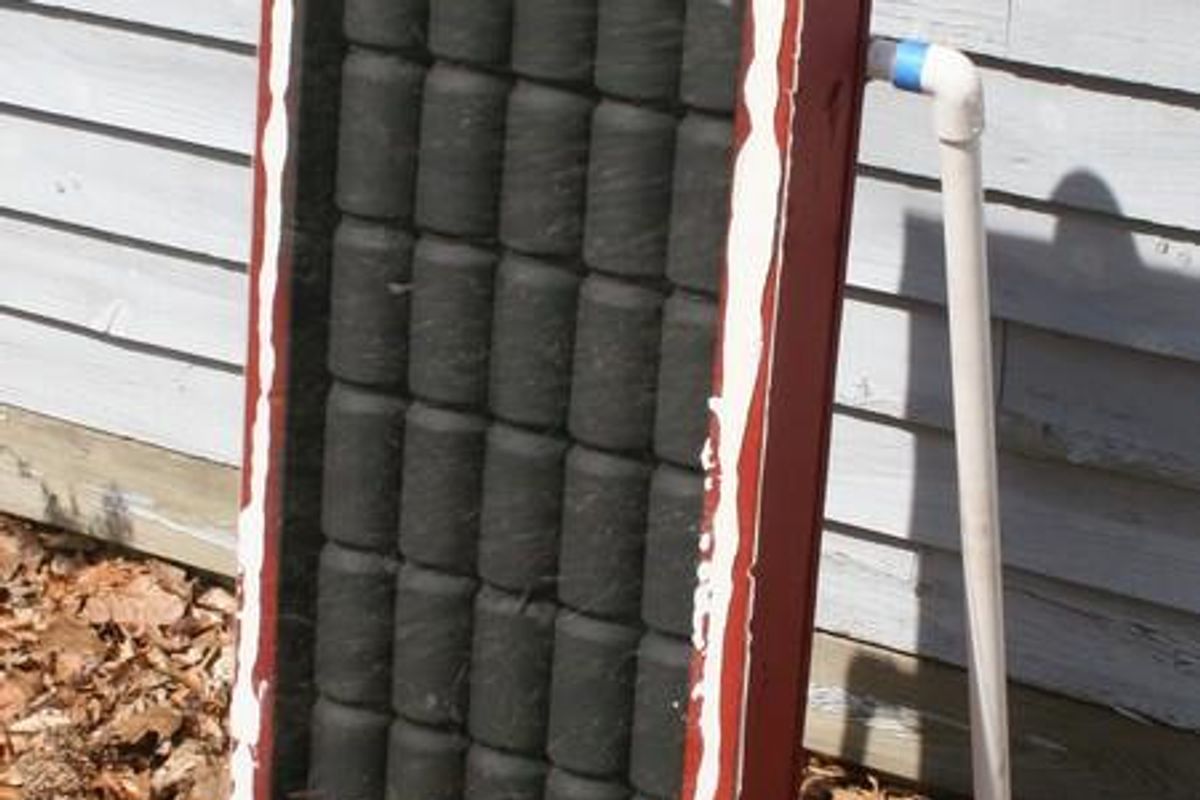
Once they're dry, I painted each column with black BBQ paint. Black to best absorb the sun's heat, BBQ paint to keep from flaking off the cans. At the top, I drilled an outlet hole. I left an inch or two of space between the tops of the columns and the top of the box to permit air to flow out of the columns.
“Oil pan. Oil Pan! OIL PAN!” Sorry, I can’t help myself when I see that photo of the blue 1958 Ford approaching the rocks.
I drilled the outlet hole based on the diameter of some wet-dry vacuum hose I picked up, about 1-1/2 inches in diameter.
“Oil pan. Oil Pan! OIL PAN!” Sorry, I can’t help myself when I see that photo of the blue 1958 Ford approaching the rocks.
At the bottom, I used another wet-dry vacuum attachement that would more evenly disperse the incoming air. Screwed it in at each end, then caulked the seal.
“Oil pan. Oil Pan! OIL PAN!” Sorry, I can’t help myself when I see that photo of the blue 1958 Ford approaching the rocks.
Then started to caulk the columns in place. At the bottom, you can see the inlet hole I drilled. At about this point, I realized that a better place for the inlet would have been through the plywood at the bases of each column. In this location, the air can simply pass over the cans (there's about 1/2 to 3/4 of an inch between the cans and the upper edge of the 2x4 frame) and not really pick up that much heat. If I were to relocate the inlet, it would force all the air to pass through the cans and pick up the absorbed heat. Next time.
“Oil pan. Oil Pan! OIL PAN!” Sorry, I can’t help myself when I see that photo of the blue 1958 Ford approaching the rocks.
Had some red paint left over from one of Heather's previous projects, so slapped on a couple coats to at least keep the weather off the bare wood.
“Oil pan. Oil Pan! OIL PAN!” Sorry, I can’t help myself when I see that photo of the blue 1958 Ford approaching the rocks.
The caulk is pretty strong. Kept the cans from falling out while I had the box inverted.
“Oil pan. Oil Pan! OIL PAN!” Sorry, I can’t help myself when I see that photo of the blue 1958 Ford approaching the rocks.
Also had some 3/4-inch PVC pipe from another previous project. Bought a couple elbows and T-fittings and whipped up a simple frame to keep the box off the ground and to angle it upward toward the sun. Didn't give the exact angle too much thought.
“Oil pan. Oil Pan! OIL PAN!” Sorry, I can’t help myself when I see that photo of the blue 1958 Ford approaching the rocks.
Caulked a clear plexiglas cover on the front and sat the furnace out in the sun for a full day over the weekend to see how it would work.
“Oil pan. Oil Pan! OIL PAN!” Sorry, I can’t help myself when I see that photo of the blue 1958 Ford approaching the rocks.
Using some advanced technological equipment, such as this precisely calibrated pyrometer, I determined the intake air temperature, which should have been the same as the ambient air temperature, to be about 80 degrees.
“Oil pan. Oil Pan! OIL PAN!” Sorry, I can’t help myself when I see that photo of the blue 1958 Ford approaching the rocks.
Using the same equipment and methods, I determined the outlet temperature to be about 95 degrees - thus a 15 degree temperature differential. Not 110 degrees, but not bad , considering I didn't even break $50 in materials - most of that being the plexiglas window.
Obviously don't have the inlet and outlet attached to the garage - figures that the day I finish the furnace, it's 80 degrees and sunny and it looks like we're finally done with winter. Dad recommends wiring a pusher fan at the end of the inlet tube to keep the air circulating through the furnace.
Were I to do this again, I'd first make the furnace larger. As I recall, Dad's measured something like four feet on each side. Obviously, the more surface area, the more heat you'll pick up. Second, as mentioned above, I'd relocate the inlet to the back of the box to direct all the air through the cans. Or at least I'd cut a piece of aluminum to act as a baffle and prevent the air from rising straight up. Third, I might use those small soda cans I've seen in the grocery stores lately, just to get more surface area.
Fourth, I'd finish the build at the beginning of winter, not the end.
UPDATE: Welcome, MAKErs. I appreciate your comments and suggestions on improving the design of the box. I also appreciated the comments over at a similar project page on Instructables. Version 2.0 will be a lot better, so thank you all.
UPDATE UPDATE: The response on this has been fantastic. Thank you all for your comments and feedback. If I didn't have the HMX to finish, I'd already be working on the next version of this box. By the way, I'm no engineer and only have the vaguest understanding of thermodynamics. I know how old cars work, that's about it. But common sense tells me to build this thing bigger, to insulate it, to add a fan and to snake the air sideways as a few of you have suggested. Keep sharing your ideas and your successes in building your own boxes.
UPDATE (22.June 2010): I've taken many of the below ideas into consideration and finally finished a second version of the soda can solar heater. From 180 cans, I've so far achieved a 120-degree temperature differential.
UPDATE (7.April 2011): One of our readers, Bohdan Zograf, worked up a translation of this post into Belorussian, for those of you who would prefer to read it in that language.
Recent

Photo: Christian Hazel
Pre-Start Oil, Fluids and Lube Check

It’s often overlooked, but since the transfer case is always spinning when driving in two- or four-wheel drive, make sure the fluid is at the appropriate level before driving off.
Photo: Christian Hazel
Most of us are at least going to pull the engine oil dipstick to check the level, condition, and smell of the engine oil. If white, tan, or foamy, that indicates water or coolant in the crankcase. Grit or excessive fuel smell are equally bad. Many automatic transmissions require the engine to be running for proper oil level indication and manual transmissions are frequently checked by removing a fill plug on the side of the tranny case. Don’t forget to pop the radiator cap (with the engine cool) to make sure the level is correct, and you’ll want to verify the transfer case fluid level, which is done most often by removing a fill plug and visually or with a finger checking the fluid level. Most cast-iron transfer cases use 90W gear oil and many aluminum units use automatic transmission fluid. If the vehicle you’re looking to buy has a full-time transfer case, it may or may not have fluid requirements with specialty additives, so you should check ahead of time when going to pick up your vehicle. Finally, make sure you pop a fill plug in the rear axle to make sure the diff isn’t dry and do the same for the front if the vehicle doesn’t have locking hubs or other means to ensure the front differential and axles won’t be spinning when going down the road.
Steering Box Safety Inspection

Loose steering box mounting bolts are unfortunately a common malady in many used 4x4 vehicles, so make sure the mounting bolts that hold the box to the frame are tight.
Photo: Christian Hazel
It's likely that you will pop the steering reservoir open to check fluid level if the vehicle has power steering and check the pressure and return line for any major cracks or damage. Now is the time to bust out that set of hand tools you brought with you (you did bring them, right?) and put a wrench or socket on the bolts that hold the steering box to the frame mount. You’d be surprised how many decent looking 4x4s we’ve gone to drag home that had loose bolts at this most critical safety point. Once you’ve got the three or four bolts (depending on box model and type) tightened up nicely, use an adjustable wrench on the pitman arm nut and make sure it’s good and snug. You don’t want the pitman arm rocking on the sector shaft splines. Finally, if you’ve got a helper, pop the hood and have somebody saw the steering wheel back and forth while you watch the steering shaft that connects the column with the steering box. You don’t want to see any excessive play in the rag joint(s) or movement at the bushing column. These tasks only take a couple minutes to perform but steering isn’t one of those places we’re apt to throw caution to the wind, so it’s time well spent on a vehicle if you don’t know the history on it.
Visually Inspecting 4x4 Steering Linkage Condition

The steering linkage should be checked to make sure there’s no excessive wobble or slop.
Photo: Christian Hazel
Like the under-hood steering shaft check, a great way to quickly visually inspect the steering linkage of a 4x4 is to have a helper saw the steering wheel back and forth while you inspect the tie-rod ends, drag link ends, and other major components as they are actuated back and forth. Missing cotter pins, obviously loose tie-rod end bolts, and loose adjustment sleeves and/or collars should all get your attention and warrant further inspection. You don’t want the linkage to be easily spun by hand or be there any major movement of the tie-rod ends inside their tapered seats in the pitman arm, steering knuckles, tie-rod or drag links, or (if applicable) idlers. If you do see any major movement in these components it’s probably best to call in the trailer or tow truck until repairs can be made to make the vehicle truly safe to drive.
Verify The Transfer Case Is In Two-Wheel Drive

Only some 4x4 transfer cases allow driving on hard surfaces without damage to internal components, so make sure you verify the transfer case is in two-wheel drive (if applicable) before hitting the road.
With the exception of certain kinds of transfer cases that are designed to allow full-time four-wheel-drive operation on hard road surfaces, you can actually do moderate to severe damage to a transfer case, driveshafts, or even axle components by operating on hard-packed, no-slip surfaces in four-wheel drive. Without any means of providing differentiating slip between the front and rear tires, operating a regular part-time 4x4 transfer case on hard packed surfaces can cause binding and excessive wear on the components. It’s always best to only use High- or Low-Range four-wheel drive in a part-time transfer case when operating on surfaces that allow some slip between the front and rear tires. That’s why it’s important to verify the transfer case of the vehicle you’re purchasing is truly in two-wheel drive (if applicable) before hitting the highway. If you’re unsure of the transfer case shift pattern and the vehicle has locking front hubs, the easiest way to verify you’re in two-wheel drive is to crawl under and try to spin the front driveshaft. If the hubs are unlocked and the transfer case is in two-wheel drive, the shaft should freely spin. The surest way to verify with a vehicle that doesn’t have locking hubs is the jack the front off the ground and spin the shaft to see if the front shaft spins independently of the rear, but in a pinch you could always just find a little dirt and if safe and the vehicle has enough power to gently break the rear tires loose, see if by throttle or other means you can get the rear tires to spin independently of the front.
Testing Front Wheel Bearings and Ball Joints

Excessive hub or ball joint play can be dangerous, so if it is present and you can’t adjust it away, consider having the vehicle towed to your shop or home rather than driving it.
Photo: Christian Hazel
Another common wear point of many 4x4 models, especially those with larger-than-stock tires is at the hubs or unit bearing assemblies as well as the ball joints or kingpins at the steering knuckles. To check you’ll ideally have the front wheel and tire jacked up off the ground. Then, grabbing the top and bottom of the tire, wiggle it by simultaneously pushing and pulling with opposite hands to see if you can initiate any wobble of the wheel/tire assembly. If you didn’t bring a small bottle jack or other means to lift a tire off the ground, from the side of the vehicle you can forcefully shove against the top of the front tire repeatedly to see if you feel any clunking or potential movement. You’ll most often feel it if it’s present. If you do get some wobbling, inspect further to see if the movement is just at the axle hub or unit bearing assembly or if the wheel and tire is moving along with the whole steering knuckle due to bad ball joints or worn kingpin bushings. If the vehicle has adjustable bearings like many older models with locking hubs or drive flanges, it may be possible to dive into the hub assembly and tighten the bearing preload, as long as the bearings, races, and spindles are still in decent shape. If it’s a worn unit bearing, then the only safe repair is a rebuild or replacement. Similarly, if you see that the ball joints or kingpins are the culprit you may want to think twice about calling in a tow truck or a buddy with a trailer rather than rolling the dice on a drive home that may have some uncertainty of success.
Fuel Leaks, Bad Lines, Sediment and Rust In Your Fuel

Rusty fuel tanks are common so check the condition of the fuel filters, fittings, and hoses.
Photo: Christian Hazel
Begin by checking the condition of the fuel lines to make sure they’re not totally dry-rotted, brittle, or broken and that there aren’t any telltale fuel leaks you can see or smell. Many older 4x4s with steel tanks will probably have a fair bit of rust and sediment depending on the duration and method of storage to which the vehicle was subjected. The fuel may also be rank and/or contaminated. If you pop the fuel cap and smell something akin to sweet varnish then the fuel has gone bad and likely won’t burn very well in the engine. It may also varnish or gum up the carb or injectors. If rank fuel is your only problem, the best method is to drain out as much as you can or at least add as much fresh fuel into the mix as possible, along with a bottle or two of your favorite fuel stabilizers. However, if rust and other sediment is in the tank then it will most likely overwhelm the fuel filter(s) quickly. For low-pressure carbureted systems you can generally get by with swapping out cheap clear plastic or metal canister fuel filters. Just drive easy and when the engine starts to fall on its face, pull over and swap in a new fuel filter. That’ll at least get you home until you can properly flush and clean the fuel system. Don’t forget to inspect the mesh or sintered bronze screen at the carb inlet, which will almost always be choked with whatever makes its way past your upstream fuel filters. Fuel-injected systems are a bit more particular when it comes to fuel quality and particulate size. For our money we’d weigh a tow bill or trailer rental against the potential cost of many expensive injection filters and possibly an injector cleaning from running fouled or contaminated fuel.
Driveshafts And U-Joints

Lifted 4x4s are often more susceptible to driveshaft and U-joint wear and damage.
Photo: Christian Hazel
It’s basic logic, but any 4x4 should have two driveshafts; a front and a rear. For certain models like Chevy or Dodge trucks with a NP203 transfer case, 1970s full-size Jeep SUVs and pickups and some CJs with the Quadra-Trac transfer case, and smattering of others equipped with various full-time-only transfer case systems, a missing driveshaft may prove more than an inconvenience since many of these were not designed to operate in two-wheel drive. Unless they were modified with an aftermarket part-time kit, running them in two-wheel drive or without a front driveshaft can actually cause premature wear and ultimate failure of the internal differential that splits power between the front and rear shafts, so if you’re unsure on what’s inside a full-time transfer case and it’s missing a driveshaft it’s probably best to put it on a trailer until you can investigate further. But assuming the driveshafts are all there and/or the transfer case is part time, a quick driveshaft and U-joint check that may be performed on level ground with the E-brake on and the wheels chocked is to set the vehicle’s transmission in Neutral to remove any pressure on the driveshafts. Then, crawl under and grab the yoke with one hand and the driveshaft with the other, trying to twist them repeatedly in opposite directions while watching the U-joint. If you see any noticeable movement between the U-joint trunnion crosses and caps then that U-joint needs replacement. You can check each side of the driveshaft this way, as well as double-cardan “CV” joints if so equipped. A little play is probably gonna get you home, but if there’s major movement within the joint then we’d recommend replacing it before driving any long distance or at speed.
Belts and Fan Clutch

Missing, cracked, or misaligned belts, a worn or wobbly fan clutch, or bad water pump bearings can be easily identified with a quick check under the hood.
Photo: Christian Hazel
Many of the old 4x4s we gravitate towards are being offered at a screaming deal. Often times, part of that low price stems from the previous owner’s apathetic maintenance and general care. First, give the coolant lines and hoses a squeeze and twist to make sure they’re not super brittle or broken. Do the same with any vacuum or heater hose within easy reach. We always cast an eyeball or two over the belts to check for any that may be missing, cracked, or frayed. Missing belts can often indicate a seized or non-functioning accessory so if the component doesn’t spin by hand that’s your tell-tale sign why the belt is off. It’s also a good idea on a vehicle with a manual fan to grab the fan blade and give a hearty wiggle to see if there’s any play at the water pump bearing, slight or otherwise. You want to do this test with the engine off unless you’re looking to trade your fingers for a pirate hook. Another quick test if the mechanical fan has a clutch is to see if the blade spins (with some resistance but smoothly) or if there’s any gritty feeling that may indicate the clutch has gone bad.
Over- or Under-Charging Electrical System

Melted or burned wires, especially to or from the alternator and battery, are a sign that it’s best not to drive the vehicle until a further examination of the charging system can be performed.
Photo: Christian Hazel
If the vehicle you’re looking to purchase hasn’t run in several years, one of the last things you want to do is toss a fresh battery in the tray and see if it’ll fire up. Aside from dry cylinder walls, questionable lubrication, and other factors that should be addressed after long-time vehicular hibernation, the electrical system can and often does suffer negatively. First and foremost, if there’s an ammeter in the dash, we’d strongly suggest taking the time to disconnect the terminals from the back of the gauge and just connecting the leads together with a small bolt or machine screw and then safely taping it off. Ammeters can and do go bad and the sudden increase in resistance from a bad ammeter can be enough to help fry an electrical system within a few quick seconds. It happened to us on a ‘78 Cherokee Chief we were purchasing and was a total facepalm moment that resulted in the need to completely rewire the vehicle from under the dash up to the headlights and everything in between. You’ll also want to check for any existing sign of burned or melted wires, especially those coming to or from the alternator and/or battery. Give the fuses a quick look to see if any are popped and if so, investigate those circuits a bit further before feeding power into the system. Finally, if all looks good and you’re ready to fire up the engine it’s a good idea to have a multimeter handy to check the voltage. You’ll want to see something around 14.4 volts from a properly functioning charging system. Some wiggle room above or below that number is acceptable, but you’re just looking to make sure that the charging systems is putting out more voltage than the battery itself to indicate it’s charging and you’re also verifying the voltage regulator hasn’t gone bad and the system is overcharging and sending too much voltage through your charging system, which will burn up components in the ignition and other systems in short order.
Suspension Bushings, Mounts And No-Nos

This broken center pin on the driver-side front spring snapped due to the increased leverage exerted using a front lift block.
Photo: Christian Hazel
When it comes to the suspension, you’re mostly going to be relying on what you see and the laws of common sense. Look at all the shackle and spring mounts on a leaf-sprung suspension or the link mounts on a coil-sprung suspension. You’re looking for obvious signs of cracking, bent components, or extremely damaged or missing bushing material. Even substantially worn suspensions are okay to drive on at safe speeds but you don’t want to go cornering like you’re at LeMans. Also, if equipped, look at the track bar bracket(s) and linkages to see if there are any cracks present. Most often you’ll find torn or cracked track bar brackets at the rear axle on coil sprung vehicles, so pay close attention to that area. One major red flag area on older lifted leaf-sprung vehicles is the use of front lift blocks. Due to the added leverage that they impart, especially during turning and braking, front lift blocks are a great way to virtually omit any margin of safety. This vintage Jeep J-2000 pickup had lift blocks in the front suspension, so we didn’t even bother trying to drive the vehicle home and instead loaded it on our trailer. Once home and we went to remove the lift blocks we found not only a cracked leaf spring plate and bent leaf spring U-bolts, but the center pin that holds the spring pack together and locates the main leaf with respect to the axle had snapped. This vehicle was potentially one good pothole away from a catastrophic failure.
Safe Tire Tread, Pressure, and Sidewalls

Severely worn, cupped, dry-rotted, damaged, or under-inflated tires are big red flags if you’re planning on driving any long distance or higher speeds.
Photo: Christian Hazel
Especially true with a vehicle that’s been sitting for years or even decades, pay close attention not only to the tire pressure, but the condition of the tread, sidewalls, and rubber before you go blasting home at freeway speeds. As for pressure, don’t automatically assume the correct tire pressure is the same as what’s listed on the tire sidewall. These are max pressure ratings, which for many applications exceed the vehicle’s recommended pressure. On a new, fresh set of tires you really won’t cause any issues other than crowning of the tread surface and premature wear of the center of the tire tread blocks by running overpressure, but with older potentially weakened or rotted tires the additional pressure adds a further risk of failure. A max of 30-psi for most ½-ton vintage 4x4s is a good ballpark tire pressure to start off with. You’ll also want to check the sidewalls and tread for severe cracking or dry rotting that could potentially indicate a propensity for the tire to delaminate. That’s a situation in which the vulcanization that bonds the tread cap to the tire carcass fails, allowing the tire to virtually fall apart as you’re driving. Severely dry-rotted tires are always a roll of the dice, especially at higher road speeds, and in our opinion not worth the risk of driving on. And naturally, you’ll want to give the sidewalls on both outer and inner sides a visual inspection to ensure there’s no gashes or major chunks missing that could increase the potential for failure. Finally, look at the tread for major signs of cupping or uneven wear that may indicate bent suspension components or improper operation in the vehicle’s past. We once purchased a vintage M-170 military ambulance Jeep and since it was only 15 or so miles from home we decided to flat-tow it on its antique Norseman tires. In short, the Norsemans were in such poor condition with cupping, dry-rot, and out-of-roundness that despite being aired to the appropriate pressure they caused the Jeep to bounce, flop, and death wobble behind the tow rig so badly the front tires were literally coming a foot or more unsafely off the ground. We ultimately had to drop speed down to 25 mph to get the darned thing home without inducing violent death wobble, but with nothing more than some fresh tires it tracked behind the tow rig like a dream.
Brakes

When checking the brake system look not only at the wheel side but pop the master cylinder to make sure there’s fluid and no telltale signs of contamination or rust.
Photo: Christian Hazel
For starters, don’t automatically assume the brake system is functional. Many older brake systems are susceptible to rusting within the system or leaking of fluid from rotten seals or corroded fittings. You first want to pop the master cylinder open to check fluid level and look for any major chunks of rust or contaminants. If the fluid looks okay, then inspect the discs if so equipped and look for cracks or major grooves in the rotors that would indicate severely worn or missing friction material on the pads. If equipped with drums, first inspect for any signs of oil or fluid contamination that may inhibit stopping. There’s nothing worse for a drum brake than a leaking axle seal coating the shoes with 90W lube. If you brought a jack and have the time it may be a good idea, especially on a four-wheel-drum vehicle, to give each wheel and tire a spin while checking shoe engagement. A brake adjustment tool or even a simple flathead screwdriver can be used to adjust the drums so that the shoes are just barely biting as you rotate the tire by hand. A four-wheel-drum brake system will stop way better than you may expect, providing it’s in good shape and adjusted properly.

Photo: Bryan McTaggart
Why Didn't Dodge Offer A Manual Transmission?

1978 Dodge Monaco A38 tribute
Photo: Hemmings Archives
Sure, the police vehicles still had teeth, but the muscular B-body offerings that Mopar had been known for were pretty much gone. Instead, the company had chased the Chevrolet Monte Carlo into personal luxury territory and the audience knew it. You could still order a watered-down 360 or even the 400-cu.in. big block, but you were pretty much stuck with the 727 TorqueFlight automatic transmission. Would you like your PRNDL on the column or on the floor, sir? It didn’t matter if you were looking at a Charger, a Road Runner, a Coronet or a Fury... the likelihood that you’ll find one with three pedals is about the same as finding a unicorn munching on the grass in your backyard. While production numbers aren’t easy to find, after 1974 a four-on-the-floor ceased to exist. If you wanted to shift for yourself in a 1975-1979 B-body Mopar, you were stuck with the A230 three-speed…on the column. Suffice it to say that there were few takers for a Slant-Six or 318-powered stripper Plymouth Fury, Dodge Coronet or Monaco.

This 1976 Dodge Charger Daytona is typical of what you would normally find: its asthmatic 360 small-block was mated to an A727 TorqueFlite three-speed automatic transmission. Solid, stable, bulletproof… and boring. As the owner of the Charger, I’ll admit that there was no real reason to even perform this swap aside from my usual reason of "because I can". The Charger’s long 2.41 rear gears made for excellent Interstate driving and returned surprisingly decent fuel economy in return. Why mess with what works?
Why Swap A Manual Transmission Into A Car That Never Came With One?

This 1987 Dodge Diplomat was a cop car from Austin that had been built into a stout performer. It featured a warmed-up 360 and an A-833 overdrive four-speed manual transmission.
Photo: Bryan McTaggart
To understand why I would take a 67,000-mile survivor and go straight under the knife with it, you need to know of another manual-swapped Mopar from my past: a 1987 Dodge Diplomat. Converted by Steve Knickerbocker, this AHB (police package) Dodge packed a warmed-up 360 and an A833 four-speed, a combination that Chrysler only put into maybe a couple hundred M-bodies prior to 1980, and without question not after 1983 in any market. I bought the car from him in 2005, had it painted Midnight Blue Metallic, threw on chrome wheels, and proceeded to drive it as if I had bought a stock car. Having owned seven other FMJ-body Chryslers throughout the years, the Diplomat was an absolute stormer by comparison. But it wasn’t so much that it had power…it was that I had control of that power with the four-speed that made the difference. I wasn't held to the lazy shifting patterns of 1970s Chrysler transmission engineers, and I had an overdrive gear to use.

The author's Charger, parked next to Matt Graves' 1983 LSX/six-speed Cadillac Coupe de Ville.
Photo: Matt Graves
Then there is a friend of mine: Matt Graves from American Powertrain. Matt is the owner of the “Chicken Coupe”, a 1983 Cadillac Coupe de Ville that is packing a 427-cu.in. LS mill, enough suspension tweaks to allow the big Caddy to keep up with a Corvette in the corners, 14-inch Baer brakes, and a six-speed. And it retains the plush velour interior that the original buyer was sold on. Call it Pro Luxury. It works better than it has any right to. It is hard to say that you own a Dodge Charger with positivity in your voice when a brougham-tastic 1980s Cadillac can stomp it into the dirt at a moment's notice.
At the end of 2023, having rid myself of the last manual-transmission car I owned (an absolute money pit of a Chevrolet Cruze) years prior, I decided that the Charger had to have a manual transmission. It didn’t matter if the car had 170-ish horsepower on tap from a smogger small-block… I can build the engine later. Having a third pedal became a priority. There is just one problem: this is a platform with about zero aftermarket support. How well would this work out?
Plan Out Your Transmission Swap Before You Begin

Before any transmission can be swapped in, the A727 TorqueFlite automatic transmission has to be removed. Overall, the automatic is in great condition. It just needs to be re-sealed anywhere a seal exists.
Photo: Bryan McTaggart
Before I was going to Sawzall a hole in the floor of my car, research had to be done. I wanted to know how difficult this swap would prove to be. I wanted to keep any kind of fabrication to a minimum, I wanted to keep the cutting to a minimum, and I wanted to keep the appearance of a “theoretically possible” look… In the end, I want the interior to look factory-possible instead of backyard butchery. I also wanted to have a minimum of five forward gears for the sake of Interstate drivability, regardless of what is going on in the engine bay. Your car can sound as mean as all get-out, but there are few things more irritating than getting passed by a Kia Soul doing 85 MPH while you are stuck in the slow lane, turning 3,000 RPM and barely doing 65 MPH.

Before anything got cut, numerous test-fits were made and patterns were marked using a nearly-dead shoe polish marker. The square is the hole for the shifter, the dot above marking the end of the tailshaft.
Photo: Bryan McTaggart
I leapt into this project with a lot of assumptions. I assumed that the 1975 re-skin of the B-body lineup was more-or-less a visual change and not a complete re-engineering of the 1971-1974 B-body platform. This opened the option of some parts from the more muscular Mopar nameplates, like Charger, Road Runner, GTX and Super Bee. Additional research suggested that the firewall of the B-body was shared with the E-body twins, the Dodge Challenger and Plymouth Barracuda. This project looked very plausible on paper.

A Malwood USA hydraulic clutch pedal and a manual transmission/brake pedal for an E-body (Challenger/'Cuda) compose the pedal assembly for the Charger. The pedals were fit prior to removing the interior, as we wanted to ensure that they would actually work before we began cutting holes into the car.
Photo: Bryan McTaggart
After some discussions with Graves, I made two purchases prior to any transmission purchase: a floor-shift column from a dearly departed 1979 Chrysler 300 and a set of 1971-1974 E-body manual transmission pedals. While I restored the column, I had the pedals shipped directly to Graves to see if they would play nicely with a hydraulic throwout bearing. By early December, I had a box filled with pedal parts and a Malwood USA Under Dash Hydraulics system dropped off on my porch. This was my cue, and for Christmas, I bought myself a TREMEC TKX with a 2.87 first gear and a .68 fifth gear.
How To Swap A Floor-Shift Column Into A Column-Shifted Car

Photo: Bryan McTaggart
As purchased, the Charger's steering column was exactly what you'd expect: big chrome shifter, PRNDL on top. We couldn't explain why the car had a Plymouth steering wheel on it, but we'd fix that as well. We began by removing the entire column, steering shaft, and shifting linkage from the Charger.


Taking Proper Measurements For Your New Transmission Before Cutting

Once we figured out where the shifter would be located, we drilled two holes for the "forward" and "rearward" shifter mounts underneath the car. With some measuring, we drew our cutting pattern in the interior and cut the floor out. Other than some minor clearance grinding on the sides, we were pretty spot-on.
Photo: Bryan McTaggart
In addition to the transmission that I had bought, American Powertrain sent other parts to see how plausible a 1975-1979 B-body manual transmission swap could be. Within a few days’ time, the pedals were installed, a process that only requires the lower HVAC vent tube and the front seat to be removed… both in the name of making space for you to work in.
My next task was to prepare the new floor-shift column for the Charger. To make a long story at least a bit shorter, here is what I did: I swapped the wiring, steering shaft, and ignition key cylinders from the original column to the new one, painted the outer body, and installed the Tuff Wheel adapter and wheel that I recently had restored by Craft Covers.

Here, we mocked up where the shifter would be for the two main shifter locations offered by the TKX. As you can see, the forward location was immediately ruled out due to interference between the Pistol Grip shift handle (and my hand) against the lower dash and the radio.
Photo: Bryan McTaggart
To properly begin the transmission fitment process, the carpet and the sound deadening that will be in the way of a shifter hole needs to be removed. Aside from presenting an opportunity to clean nearly fifty years’ worth of detritus from the carpet, it also brought to light the 99.5% complete broadcast sheet for the Charger. Having removed that little note of history, the Charger was placed upon 3-ton jack stands and ramps and the A727 TorqueFlite was removed from the car.
Numerous test-fits were performed to make sure that we had the optimal location for the shifter hole for our TKX before we broke out our grinder and started cutting. In the end, we cut a 12 x 4-inch hole in the floor that, while a bit oversized for the final product, allowed just enough room to very work from above and below. In addition, a section of a floor brace that was both in the way of the shifter and redundant due to the transmission crossmember was cut away as well. Once trimming was complete, a test-fit of the transmission with the bellhousing attached showed that while tight, the entire assembly would fit. With that, the new flywheel, pilot bearing, and clutch were installed, and it was time to bolt everything together for the last time.
1976 Charger TKX Installation Details

Photo: Bryan McTaggart


The Cost Of Swapping A TREMEC TKX

Photo: Bryan McTaggart
Putting a dollar figure to this build is going to be difficult. Part of this deal is an exchange with American Powertrain – for the help prototyping a potential new platform for them and provide post-installation advertising options, they supported this swap with parts. The other thing to consider is the “handshake deals” that were worked out between friends and contacts. Being up-front, I am not going to fully disclose every cost I paid, nor will I highlight everything that I did not pay money for. But for the sake of transparency, here is an idea of what you would expect to spend to get this project started.
- TREMEC TKX (Ford-style, 2.87 first, .68 fifth), from American Powertrain: $2,250
- Lakewood LK7000 bellhousing adapter: $358.95
- Lakewood inspection cover #50360: $51.20
- Driveshaft: $409
- SFI Flywheel: $279
- Underdash Hydraulic Clutch Kit, with reservoir, hydraulic lines, and Malwood Clutch Pedal: $625
- Hurst Pistol Grip shifter for 1971-74 Mopar B/E body #5388575: $348.95
- American Powertrain’s Oil Service Package, which includes break-in oil, Driven Racing Oil STF fluid, and DOT 3 brake fluid for the hydraulic throw-out bearing: $100
- Pilot bearing, SB Mopar to Ford TKO: $63
- American Powertrain “White Lightning” Shifter mechanism for TKX with offset shifter adapters: $339
- Hooker BlackHeart Transmission Crossmember BHS567: $196.95
- Differential Gear Upgrade: about $1,000
Gear Ratio Comparison

In addition to the transmission swap, we chose to upgrade the Chrysler 8.25 rear axle, swapping in a set of 3.73 rear gears and a limited-slip differential. Big thanks to Ron's Machining Service and Seth at Rears and Gears for their help with the re-gearing project.
Photo: Bryan McTaggart
STOCK: Chrysler A727 TorqueFlite
1st/2.54....2nd/1.54....3rd/1:1....Reverse/2.21....Rear Axle Ratio/2.41
MODIFIED: TREMEC TKX (Ford-style)
1st/2.87....2nd/1.89....3rd/1.28....4th/1:1....5th/0.68....Reverse/2.56....Rear Axle Ratio/3.73
Note: TREMEC TKX is offered in both Ford and GM-style bellhousing bolt patterns and is offered with close and wide ratios, with numerous gear ratio options. First gear can be as low as 3.27 or as high as 2.87 and overdrive can be as low as 0.81 or as high as 0.68. There are also two Reverse ratios: 3.00 and 2.56.
Sources
American Powertrain
931-646-4836
www.americanpowertrain.com
Mark Muffler Shop
270-781-6722
www.markmufflershop.com
Ron's Machining Service
800-694-3098
www.ronsmachiningservice.net
Rears and Gears
423-963-2671
Trending


╳